This post will guide you through the basics of publishing your academic bio and CV on your own OpenCUNY site. In this tutorial, you will also learn how to activate and use plugins, format a custom menu, and change your basic website settings. At the end, you’ll learn how to further build on these steps.
What You’ll Need to Get Started
- You’ll need to be an OpenCUNY participant and have an OpenCUNY website where you can build. You can sign up for a username and/or create a new website here.
- You’ll need an academic bio to post.
- You’ll need a version of your curriculum vitae that you can post online. The CV section of this post will further discuss formatting possibilities for this document.
Posting Your Academic Bio
You’ll be posting both your academic bio and your CV as pages on your website. While posts are great for timely updates, pages are best for this type of information. To read more about the distinction between pages and posts and to learn more about basic WordPress terminology, read this OpenCUNY.info post.
- In the Dashboard for your site, go to Pages>Add New. Paste your academic bio into the content editor and format it according to your liking.
- In the title area, you’ll want to label this page with your name or as an academic bio. Below the title area, WordPress will auto-generate a link from this title, which you can edit. When you later choose a theme, this title will display differently, so you can decide then what sort of title best fits your aesthetic.
- Aside on Themes: The default theme is flexible enough to get you started. It’s better to switch themes once you have content on your website, so you can really get a sense of how things will look. As such, you’ll find information at the end of this post about switching themes once you’ve set up your academic bio and CV.
- When you are done with the basics of formatting your bio in the content editor and titling the page, click “Publish” in the box stacked at the top of the right-hand column.
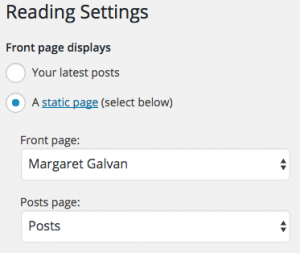
Figure 1. Settings>Reading - To make this academic bio the front page of your website, go to Settings>Reading. In the front page displays section at the top, select “A static page” and then choose the title of your academic bio for the front page (cf. Figure 1). Scroll down to the bottom of Settings>Reading to click to save your changes.
Et voilà! Now, your academic bio is published and appears on the front page of your website.
Future Steps for Your Academic Bio
- Consider putting links into your bio to link to relevant materials elsewhere on the web or on your own website itself once you start creating more content.
- Consider inserting a photo of yourself onto the bio page.
- Consider noting when the bio was last updated (i.e. “last updated ‘month’ ‘year'”) at the bottom of your academic bio (and on your CV, as well).
Posting Your Curriculum Vitae
There are two major methods for posting your CV, so you can pick your poison. The first method involves using a plugin that will allow you to create a viewer for a static copy of your CV that you upload to WordPress. The second method is to copy and paste a version of your CV into the content editor and format it there. This method will allow you to create links to relevant information throughout the CV. The first method can be done lickety-split, while the second will require more time and energy. So, go ahead, & choose your own adventure!
Important Note: No matter which method you use, you will likely need to have a web version of your CV that is different from the one that you send out. As an example, you will likely want to redact your own address and personal information from the top of the CV and you may choose to redact the information about your references from the end of the CV.
Method One: Creating a Viewer for a Copy of Your CV (Easy, Quick)
- In the Dashboard for your site, go to Plugins. Find and activate the Google Doc Embedder plugin. This plugin allows you to embed a document into a page, so you can scroll through and view it.
- Go to Pages>Add New. Title your page (e.g. CV, Curriculum Vitae, etc.). Remember the aforementioned tip that WordPress auto-generates a link based on your title, which you can edit.
- Click Add Media, which is located above the content editor and below the title field. Select to upload files and select the web-ready version of your CV. After it uploads, WordPress will generate a URL (i.e. link) for the file that you will be able to see at the right-hand side of the interface. Copy that link into your clipboard, then exit the media interface without inserting the CV into the post.
- Click the Google icon near the top of the visual content editor. Paste the link for the file into URL or Filename field. After you do that, you can also select a few more options about how the file will display before clicking to insert the document into your page. This plugin will generate a square-bracketed shortcode that will create the viewer for you when you publish the page.
- Click “Publish” in the box stacked at the top of the right-hand column.
- Click to continue reading below about the finishing touches for your CV and representing it on your website.
Method Two: Formatting Your CV in the Content Editor (More Advanced)
- In the Dashboard for your site, go to Plugins. Find and activate the TinyMCE Advanced plugin. This plugin adds more features to the visual content editor that will make accessible more advanced formatting for those who aren’t familiar with HTML or comfortable with the text content editor.
- Go to Pages>Add New. Title your page (e.g. CV, Curriculum Vitae, etc.). Remember the aforementioned tip that WordPress auto-generates a link based on your title, which you can edit.
- If you want to preserve some of your formatting from your CV in Microsoft Word (or another text editor), copy and paste your CV into the visual content editor. The formatting won’t copy over perfectly, but it may be enough to get you started.
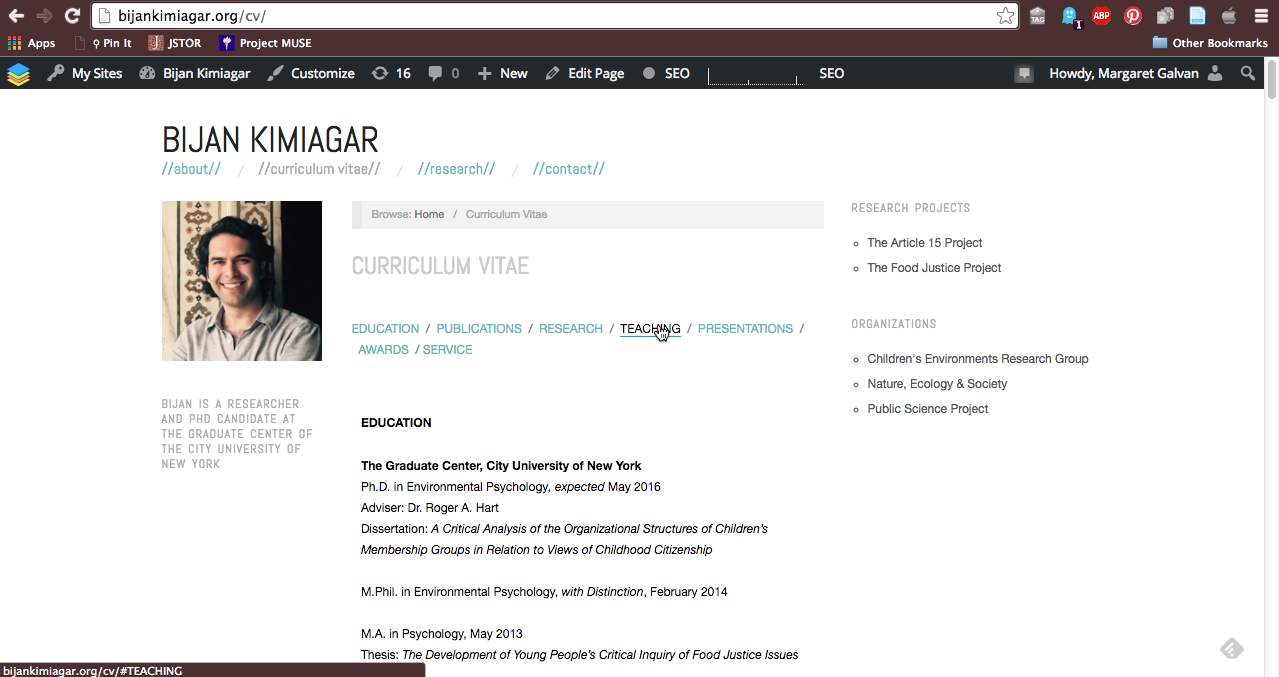
Figure 2. A CV with Anchor Links - Because any CV formatted in this way is a lot to scroll through, many people add anchor links (aka jump links) that allow you to click down to a particular section within the same page. The TinyMCE Advanced plugin will allow you to create these anchor links without needing to code them with HTML in the text content editor. Figure 2 shows a CV where anchor links are being used. In this image, you can see the link to the “teaching” anchor in the bottom left of the image.
- If you’d like to create anchors for your CV, you will first want to create a list of the sections that you’ll be linking to at the top of your CV, as you can see in Figure 2.
- Next, you will need to create anchors where the section titles at the top will link to. In the visual content editor, scroll to the beginning of a section that you want to link to. Put your cursor at the front of the section header. In the menu that’s now at the top of your visual content editor thanks to the TinyMCE Advanced plugin, click the “Insert” tab and select “Anchor.” You will need to give the anchor a simple name that you will be linking to. Copy that name to your clipboard, then click “Ok.” You will see a small anchor image appear where you placed the anchor.
- Scroll back to the top and select the full text for the section that you just created an anchor for. Click the “Insert” menu item again and select “Insert/edit link.” In the space for the URL, you will type #, then paste the name of the anchor that you just created and copied into your clipboard. Click “Add Link.” You have now created your first anchor link. Repeat this process for all of the sections that you want to create anchor links for.
- You can also create anchors links back to the top at the end of each section, as well. To do this, create and name an anchor at the very top of your page in the visual content editor. Then, write “Back to Top” or some other descriptive text at the end of each section of your CV and link it to that anchor in the format described in step 7 (i.e. # plus the exact name of the anchor; lowercase and uppercase matter here).
- When you are done with formatting your CV in the content editor, click “Publish” in the box stacked at the top of the right-hand column.
- Continue reading below about the finishing touches for your CV and representing it on your website.
Finishing Touches for Your Curriculum Vitae
Now that you’ve published your CV under either method one or two, it’s time to make sure that it is easily accessible from the front page of your website, which now shows your academic bio thanks to step 5 in “Posting Your Academic Bio.” To do this, you’ll be creating a menu to display on your website.
- In the Dashboard for your site, go to Appearance>Menus.
- Click the “create a new menu” link near the top. Title your menu (e.g. “main,” “primary,” etc.) and click “Create Menu.”
- You can now populate the menu with items on the left. You will see a section for “Pages,” and both of the pages you just created may be immediately visible. If not, click the “view all” tab within the “Pages” section to see all of the pages you’ve created. Click the checkboxes next to your CV and academic bio, then click the “Add to Menu” button.
- You’ll now see these items in the menu you’re building. You can drag them into the order you want or even nest one item below the next. Click to read more about how you can configure menus.
- When you have the items in the order you would like, select the “Primary Menu” checkbox in the “Menu Settings” at the bottom of the menu, then click “Save Menu.” Your menu will now appear with the items you’ve put into it in the primary menu location as determined by the theme.
Congratulations! You now have your academic bio and CV posted on your website and organized in an easily accessible manner. Read more below about next steps.
- Theme Selection. Now that you have some content and infrastructure, it is time to choose a theme. Through Appearance>Themes, you can select a theme. Read more tips about how to choose a theme on OpenCUNY.info. You can also browse available themes on the WordPress codex and request themes.
- Plugins. Throughout the course of this tutorial, you’ve activated at least one plugin. Plugins add additional functionality to your site. Another great basic plugin to add is the WP Jetpack plugin. Among its many features, you can add a Twitter timeline widget, a widget containing icon links to your social media elsewhere, edit your CSS, create a contact form, and nearly thirty other useful features. Read more on OpenCUNY.info about how to set up your Twitter timeline through WP Jetpack. You can also browse available plugins on the WordPress codex and request plugins.
- Domain Mapping. Once you’ve developed your content further, you may want to have your own URL. OpenCUNY provides domain mapping services.
- Get in Touch. You can also always email the OpenCUNY Coordinators with questions, set up one-on-one meetings, or even facilitate a website-building workshop for your program or student organization. In addition to this post and others linked throughout this post, OpenCUNY.info contains an array of other helpful tutorials and tips.
Comments by Margaret Galvan